How to prepare a Straw Bale Garden
|
What are Straw Bale Gardens?
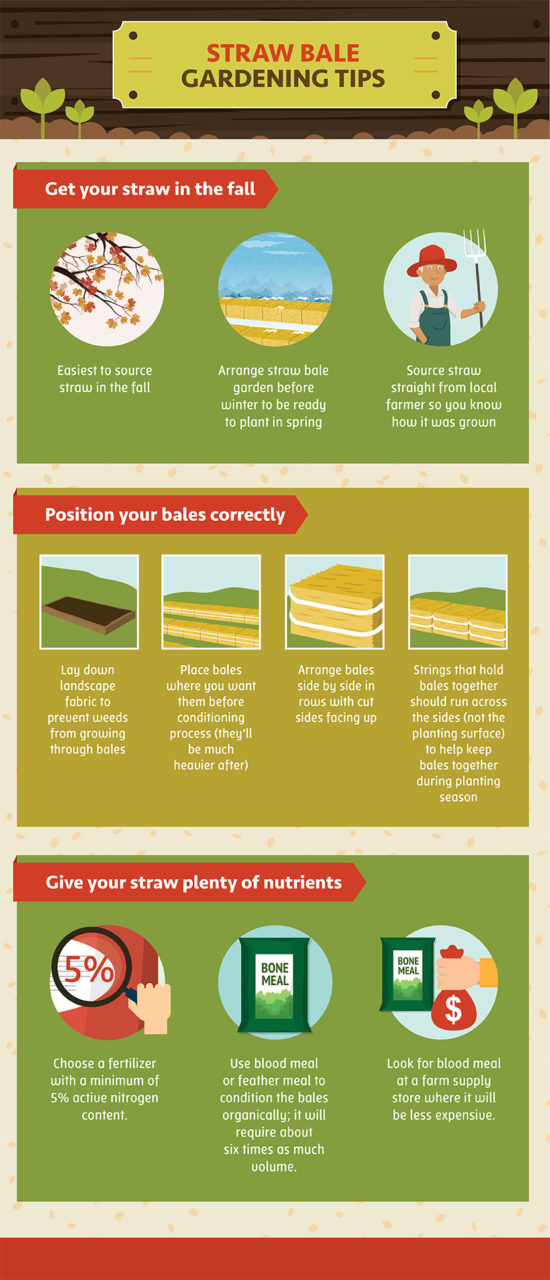
They're the answer to your prayers if you have poor soil or a bad back or both! They're a no muss, no fuss way of gardening that you are going to love. You can create the perfect layout or design for your garden and it couldn’t be easier. Imagine no weeding, no back breaking toiling in the yard... it’s true, this can be you! The versatility of this style of gardening is enormous. You can build a Straw Bale Wall or a Straw Bale Garden Bed. So, what exactly is Straw Bale Gardening we hear you ask? In a nutshell you use Straw Bales the same way as if you were using Raised Beds. The major difference, is you don’t need additional soil. While we’re on the subject, it’s important to recognise the difference between straw and hay. A lot of people think that Straw and Hay are the same, they are not! Straw is stalk and Hay is grass, don’t get them mixed up. How To Condition A Straw Bale. The advantages of Straw Bale Gardening are numerous. It’s tried and tested, portable, you can plant mostly anything in Straw Bale Gardens and when it decomposes, it becomes great compost for your garden. The first thing you need to do is get your Straw Bale ship-shape and ready for planting. The best spot is in direct sunlight. Full sun is defined as six or more hours a day of bright, direct sunlight. Although some vegetables, such as lettuce and green beans, can grow in partial shade, most vegetables need full sunlight in order to thrive. Whilst Straw Bales can be portable if you add wheels underneath, you really need to pop them in a location in your yard that has easy access to water. As you will be watering regularly, they will become too heavy to move, so place accordingly. There is a step by step tutorial that shows you how to build the mobile frame here. The infographic to the right gives a detailed guide to what is required to condition your straw bale. For average Straw Bale Gardens you will need: Sheets of newspaper or cardboard to place under the bales A hand trowel A garden hose Organic fertilizer — especially bone meal or blood meal Straw bales Soil or compost if you need to direct-sow seeds Straw Bale Gardening Instructions. Place a sheet or two of newspaper or cardboard on the ground where you want your garden. The paper should extend several inches beyond the edge of each bale. Then, place a bale on top of the paper. The paper prevents weeds from growing up and into the bale. Make sure you arrange the bales the way you want them. Leave space between them so that you can push a lawnmower or wheelbarrow among the bales. Once they’re in place, they get heavy when water-logged, and are difficult or impossible to move. How To Plant Out Straw Bale Gardens. Now that you have properly conditioned your Straw Bale, we’re onto the best bit and that is to plant out your Straw Bales with vegetables. Here’s the recommended number of vegetable plants per Bale according to ‘Safer Brand’ Tomatoes: 2 to 3 plants per bale Peppers: 4 plants per bale Squash: 2 to 4 plants per bale Zucchini: 2 to 3 plants per bale Cucumbers: 4 to 6 plants per bale Strawberries: 3 to 4 plants per bale You can also grow lettuce and green beans in straw bales, but the number of plants depends on the varieties. Check the seed package. Both lettuce and beans grow easily and quickly by direct sowing methods (planting seeds directly). Use your trowel to dig into the top of the straw bale. Make a hole about the size of the container your vegetable plant came in. Gently slide the plant out of the container. If it sticks, tap the sides and back of the container to loosen the plant. Don’t tug it by the stem — you can easily break the stem and hurt the plant. Place the plant, root-side down, into the hole and gently push the straw back into place around the soil and onto the roots. Water in well. |


