In this issue, we’ve included some educational fun combined with craft and science! While strictly not all games, you can have a great time with the grandchildren creating long-lasting enjoyment and new skills, experimenting with the natural elements.
If you have any ideas we can pass on to other grandparents use our CONTACT US form to share it with us and we'll share it with our readers.
If you have any ideas we can pass on to other grandparents use our CONTACT US form to share it with us and we'll share it with our readers.
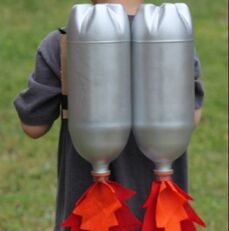
JET PACKLetting your grandchildren jet off to an imaginary land where they are a superhero is important developmental play. It’s as simple as spray painting two large soft drink bottles and attaching felt to mimic flames.
This creation is quick – around 30 minutes to make – and it’s inexpensive using empty bottles. Just add some paint, straps and felt for the perfect imagination play piece, or a costume or outer space party. Best of all, you’ll be the most popular Grandy in the galaxy … You’ll need:
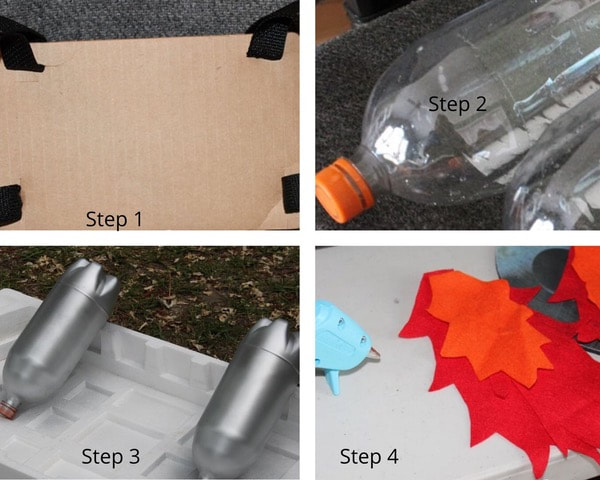
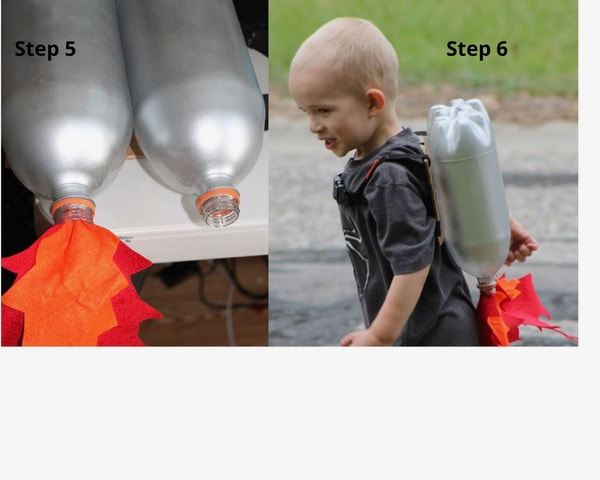
Step 1: Begin by cutting a piece of cardboard that fits the width of the back. Cut a slit in the top edge and bottom edge of the cardboard. Slide ribbon or webbing in the slits and hot glue or staple them to themselves. Use some old backpack webbing and staple or hot glue in place to go around his arms. Step 2: Clean and dry the bottles. 2-litre bottles are the best, but you could use any size. Step 3: Lightly mist the tops of the bottles with silver spray paint. You don’t have to bother to paint the backside of the bottles, as they will be glued to the backboard and won't show. Step 4: Cut flames out of felt in red and orange and yellow (if you have it) for each rocket engine. Step 5: Hot glue them in the spout...this could get fancier, with streamers and tinsel...but it doesn't have to. You could even use old grocery bags from the grocery store – we’ve all got extras in the boot! Step 6: Hot glue the bottles onto the cardboard. You could also hot glue a little rectangle of felt onto the front straps for the ignition switch. Watch out… you’re ready for take-off! |
|
BALLOON BLOWUPS
A bit scientific… a bit educational… and a whole lot of fun!
You’ll need:
o Empty Plastic Bottle
o Vinegar
o Water
o Baking Soda (Bicarbonate of Soda)
o Balloon
o Funnel
Method:
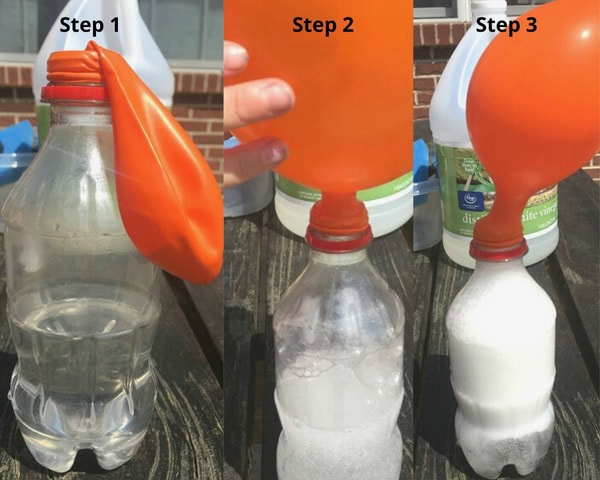
Step 1: Fill 1/3 of the plastic bottle with equal parts of vinegar and water.
Step 2: Using the funnel, put a heaped tablespoon of baking soda into your balloon. Stretch the mouth of the balloon over the bottle’s top, being careful to not spill the baking soda into the liquid.
Step 3: When you are ready for action, lift the balloon up and shake the baking soda into the vinegar mixture.
The results happen almost immediately!
Notes:
1: Explain to your grandchild that as the baking soda and vinegar mix together they release carbon dioxide. The gas bubbles up from the mixture and expands up and out of the bottle and fills the balloon.
2: You can take the experiment further by changing a few things. The pictures feature a 12-inch balloon. If you have 2 balloons of different size, you could try the experiment and see how the different sized balloons affect it. Or, try using more vinegar to see what happens. What happens if you use more/less baking soda?
You’ll need:
o Empty Plastic Bottle
o Vinegar
o Water
o Baking Soda (Bicarbonate of Soda)
o Balloon
o Funnel
Method:
Step 1: Fill 1/3 of the plastic bottle with equal parts of vinegar and water.
Step 2: Using the funnel, put a heaped tablespoon of baking soda into your balloon. Stretch the mouth of the balloon over the bottle’s top, being careful to not spill the baking soda into the liquid.
Step 3: When you are ready for action, lift the balloon up and shake the baking soda into the vinegar mixture.
The results happen almost immediately!
Notes:
1: Explain to your grandchild that as the baking soda and vinegar mix together they release carbon dioxide. The gas bubbles up from the mixture and expands up and out of the bottle and fills the balloon.
2: You can take the experiment further by changing a few things. The pictures feature a 12-inch balloon. If you have 2 balloons of different size, you could try the experiment and see how the different sized balloons affect it. Or, try using more vinegar to see what happens. What happens if you use more/less baking soda?
EARTH DAY RECYCLED GARDEN
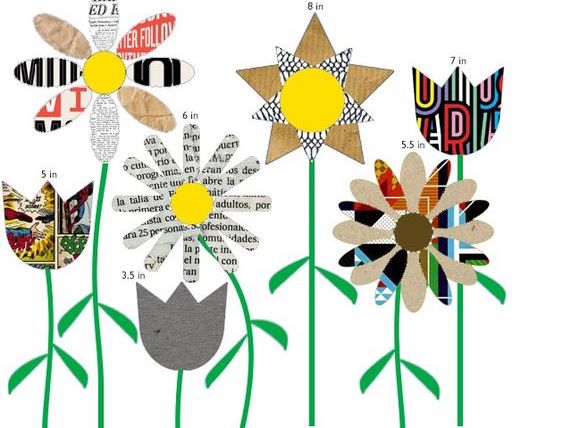
This is a fun and free way to celebrate Earth Day – April 22 in 2021 or any day at your home! Your grandkids can help you upcycle trash into beautiful flowers, while also learning to understand about caring for our environment.
Here’s how:
· Have your grandchildren (and their parents, and you!) collect paper scraps (trash) over the course of several days, or more, if needed. Collect all the scraps into one big box. If you have the budget, you might want to buy a few sheets of craft paper from the cheap shop to augment the selection, e.g. green paper for stems and leaves.
· On the big day, have each child design his/her dream flower, using a piece of paper and colored pencils. What would they like their unique, individual flowers to look like? (While they are designing, empty contents of their paper-scraps box onto a table.)
· Have the kids head to the “scraps table” and select which pieces will best make their flower vision a reality.
· They build their flowers, minus the stem.
· You may then assist them with cutting out their desired stem and leaf shape. If you need help, you’ll find plenty of free templates on line to download.
· Supervise putting their flowers onto either individual sheets of craft paper or one large sheet to combine them all and gluing with a non-toxic glue stick.
EARTH GARDEN XYLOPHONE
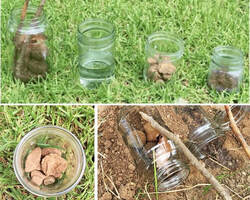
Your grandchildren can decide which ‘instrument’ makes the best music – the Rainbow Water Xylophone or this one! Save empty glass food jars or buy a few inexpensive jars from a craft or dollar store for the garden xylophone.
You will need:
§ Empty glass jars. You can use different sizes, but you can also use jars of the same size – see below.
§ Dirt, grass, rocks, water, mud or anything else kids can find outdoors to fill their jars
§ Two sticks or two spoons
Method:
1. Wash and dry jars
2. Set the jars on a flat surface outside and fill them with different objects found around the yard. These jars are filled with leaves, rocks, mud, dirt, grass and water.
3. If your jars are all the same size fill them with different amounts of objects from the yard. This will change the sound for each jar.
4. Once the jars are filled you can use sticks or spoons to play the xylophone while the jars are sitting upright. You can also set them in a pile of loose dirt one their sides and leave them in your garden for kids to play music and refill each time they play outside!
RAINBOW XYLOPHONE

A fun water play activity that combines art, music, science and math. It’s great for toddlers, pre-schoolers and elementary-aged kids, and you can make it with materials you already have in the house. It’s also a great way to introduce the scientific method to kids.
You’ll need:
· 6 repurposed baby food jars, mason jars or drinking glasses
· Blue, red, and yellow food colouring
· Water, as needed
· Measuring cup
· Xylophone striker, honey dipper or safe toy hammer
Instructions:
1. Use the measuring cup to portion out varying amounts of water into each jar.
(The average baby food jar holds 4oz (120ml) so your increments should be close to: 1oz (30ml), 1.5 oz (45ml), 2oz (60ml), 2.5oz (74ml), 3oz (90ml), 3.5oz (104ml) and 4oz - adjust based on the number of jars and type you are using.)
2. Add drops of dye to the water to create a rainbow set of jars. Try to do it according to the order of the rainbow: Red, Orange, Yellow, Green, Blue, Purple.
3. You can stir the dye to help it set faster, or watch the dye slowly spread throughout each jar and change the entire water contents of each. This is a great opportunity to talk about pollution or how contamination occurs.
4. Use your striker to play your "water xylophone" and hypothesize about why each jar is making a different sound.
Notes: There are many simple ‘tunes’ such as the one suggested to be found online – pick your child’s favourite nursery rhyme and help them play it.
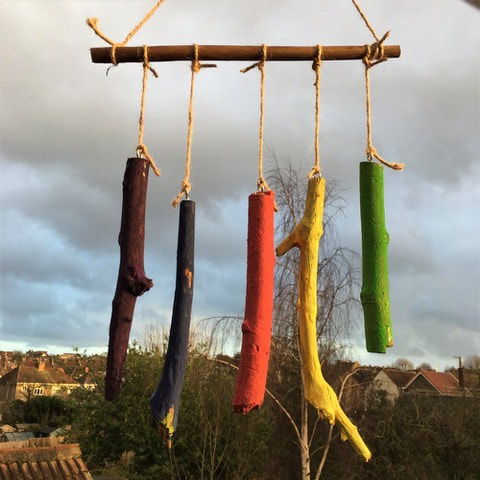
NATURE WIND CHIMES
|
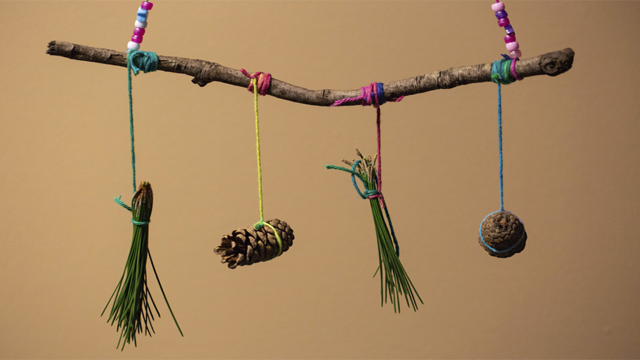
A craft with more steps means a lot of little helpers are needed! These nature wind chimes will really add something fun and colourful to the outside of your home.
What you’ll need: · Sticks, pinecones and other items from nature · Yarn (or fishing line, jute, twine, etc.) · Optional: beads, googly eyes, paint and other craft items Instructions: 1. Snap sticks into lengths of 8-10 inches. 2. Decorate your sticks if you’d like. 3. Use yarn to fix your sticks and nature items together. Optional: If desired, add a coat of craft varnish. The varnish helps protect the wind chime from nature’s elements, as well as intensify the colors of the paint. If you want to get even more crafty, attach a selection of different length and diameter sticks with screw eyes to your master stick and paint with acrylic paint. You’ll probably also need to sand-paper them first. They make a wonderful ‘clunking’ noise in the wind! |
|
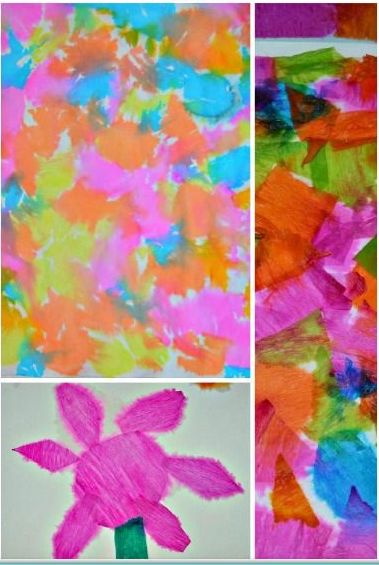
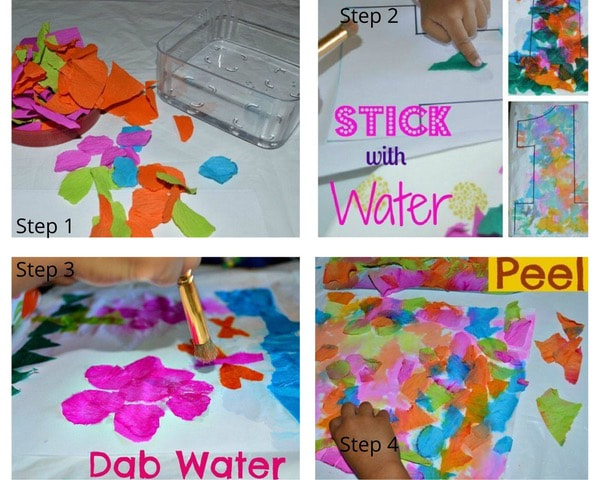
EASY ART PROJECT - JUST ADD WATERThis is a very easy-to-set-up water art project for kids aged two and best of all, even though it involves water, there’s not a lot of mess! You only need crepe paper or streamer paper, paint brush, white craft paper and water. Crepe paper comes in sheets and streamers, obviously in strips, but either way, kids love tearing them up! Good fine motor practice, too! Here’s how: Step 1: The best part! Tear up the crepe paper or streamers into small pieces Step 2: With a paint brush, “paint” the craft paper with water. Depending on the child’s age, here are some suggestions to suit this step. · Spray water on the white paper and stick the coloured paper bits- Good for a toddler · Use a brush to ‘paint’ with water and then stick the coloured bits – Good for a toddler · Arrange the bits in groups of four or five and use a medicine dropper to drench them with water – Good for a pre-schooler and above · Arrange the bits in small groups and then dab them with water using a brush (great practice for brush control) – Good for a pre-schooler Step 3: Get the children to arrange the bits, moisten the bits with water and help them wait for the whole area to dry. As soon as the water hits the crepe paper they will see the coloUr bleeding out on to the white paper. Step 4: Once the entire paper is dry, have the children peel off the paper, leaving their fabulous pattern behind. Definitely worthy of a frame! Word of warning: Watch out for those too eager “water pourers” … the paper will easily become soaked and tear. |
|
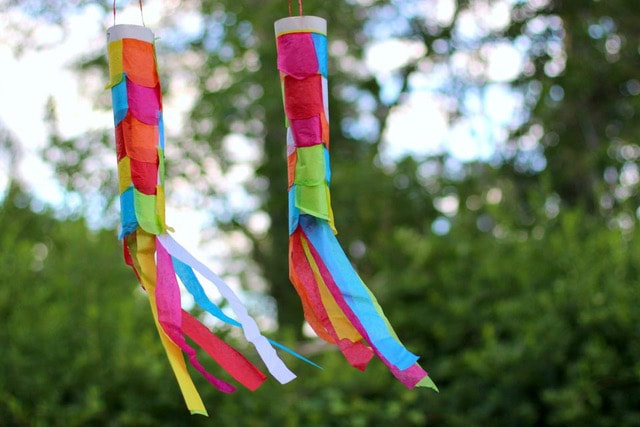
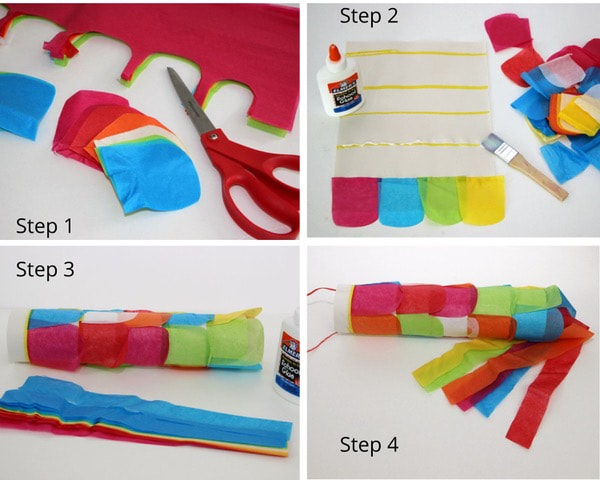
TISSUE PAPER WINDSOCK
|
These look so colourful floating in the wind! Plus, they are so easy that toddlers to early elementary aged kids can do them!
Materials· Tissue Paper· Construction/craft Paper
Method: Step 1 Cut the tissue paper into small shapes. These will be what you layer onto your construction/craft paper to make the main portion of the windsock. These are cut out to resemble “scales” on a fish, but you could do any shapes that you want. Cutting is a great fine motor activity for kids. Step 2 Use a pen to draw lines across the paper for the kids to use as a guide for the glue. Make sure that the lines are close enough together that the tissue paper would overlap the row below it, giving it a layered look. Squeeze the glue along the lines, then used a paintbrush to spread out the glue. You can do each of the lines at once or as you go, whatever you prefer. Next, starting at the bottom, add tissue paper in any patterns or designs of your choice. When each line is covered with tissue paper, set aside and let dry. If you spread the glue out with a paintbrush, rather than just squeezing out a line of glue, it dries faster. Step 3 While you wait for the glue to dry, cut long, rectangular strips from tissue paper to be used as the tails of the windsocks. Once dry, glue the long sides of the construction/craft paper together creating a “tube” shape. Step 4 Next, glue the tissue paper strips to the inside of one end of the tube, creating the windsock tails. The last step is to add some string to the other end so that you can hang your creations. You can also use tape for these last steps to avoid having to wait for it to dry again. |
Pic 1
Pic 2
|