Create your own artisan wrapping.
Wrapping paper can be so expensive when the effect lasts only a few moments before it is ripped from your lovingly wrapped gift. So here are some fabulous fun ideas for making your own. Not only will your gifts have a distinctive personality, you can even tailor your designs to match the personality or taste of the recipient. But, best of all, you can use this craft opportunity to have a wonderfully creative time with your grandchildren, making fantastic colourful papers that they can use for gift wrapping as well. There's no limit to the opportunities available for this low cost craft, as you'll see below.
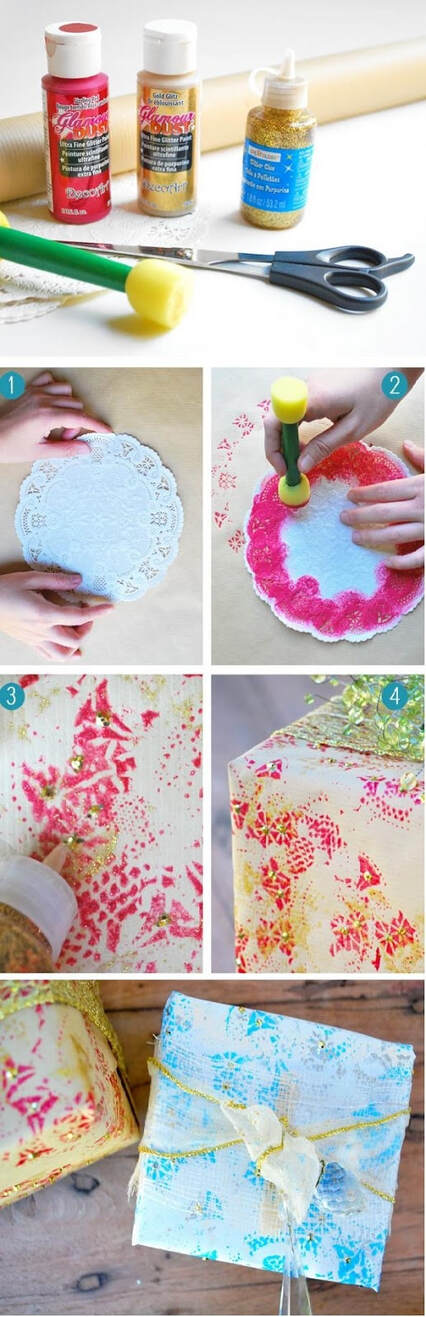
Doiley Dazzler
What you will need:
What to do:
Grandchildren will love this activity as it is so easy to do but yields such amazing results. They can make a sheet or two each or perhaps you could organise them into a production line with one doing the painting, one doing the glitter, and one applying the extra decorations if you are using them. However you want to organise it, you should enjoy a couple of hours fun and generate a whole lot of Christmas cheer.
What you will need:
- Some white butchers paper or packing paper
- Glamour Dust or Glitter in various colours but including Gold
- A sponge brush (You can make your own with a piece of rounded sponge held in a pair of tongs)
- Some paper doileys from your local supermarket or discount store
- Some non-toxic poster paint... red, green, blue, gold... whatever takes your fancy
- Some craft glue and a brush
What to do:
- Place a doiley on the paper, dip your sponge in poster paint and apply over the top of the doiley so that it becomes a stencil to print the cut-away pattern onto the paper.
- Apply whole circles or parts of the cicle as you like to create a lacy pattern on the paper.
- Dust parts of the stencil with glitter while the paint is still wet. You can apply more glitter when the paper is dry if you want to, by wiping a brush dipped in craft glue across the paper in places where you want the glitter to stick and then dust a coating of glitter over it.
- You can even glue on little jewels, sequins or other decorations as you wish to make your wrapping even more luxurious.
- When the paper is completely dry shake off the excess glitter and use it to wrap your gift together with some complementary ribbon or light fabric.
Grandchildren will love this activity as it is so easy to do but yields such amazing results. They can make a sheet or two each or perhaps you could organise them into a production line with one doing the painting, one doing the glitter, and one applying the extra decorations if you are using them. However you want to organise it, you should enjoy a couple of hours fun and generate a whole lot of Christmas cheer.
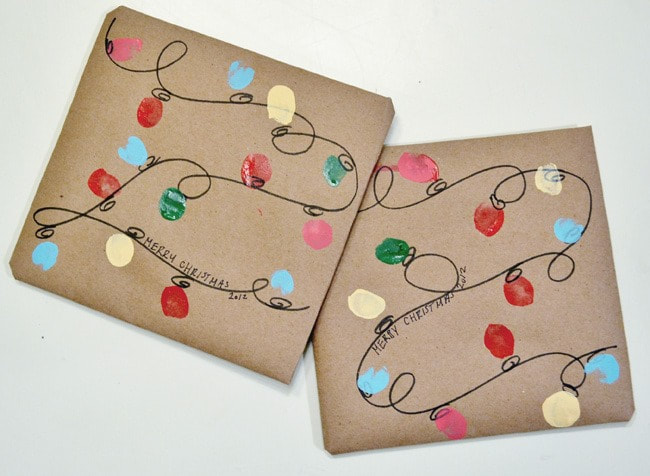
Christmas Lights
What you will need:
What to do:
What you will need:
- Some white butchers paper or packing paper or brown paper
- A sponge brush (You can make your own with a piece of rounded sponge held in a pair of tongs)
- Some non-toxic poster paint... red, green, blue, gold... whatever takes your fancy
- A black felt-tipped pen
What to do:
- Put the paint out in small bowels or saucers
- Lay a piece of white or brown paper (brown works really well with various colours)
- Have the children daub random blobs of paint on the piece of paper
- When the paint is dry, connect the dots with the felt-tipped pen so that the coloured blobs look like a string of fairy lights.
- You can also write Christmas message on the paper if you wish.
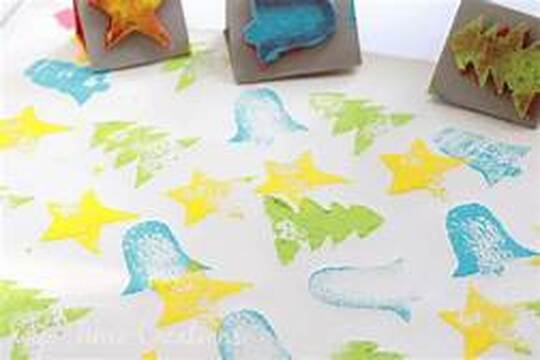
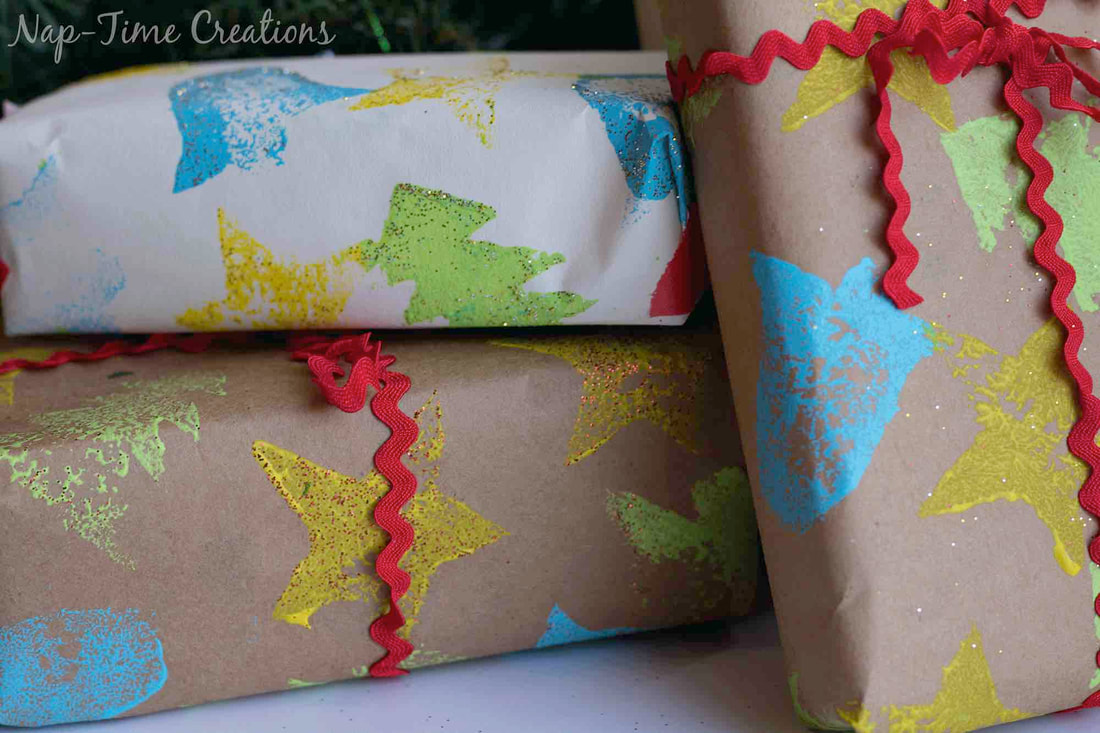
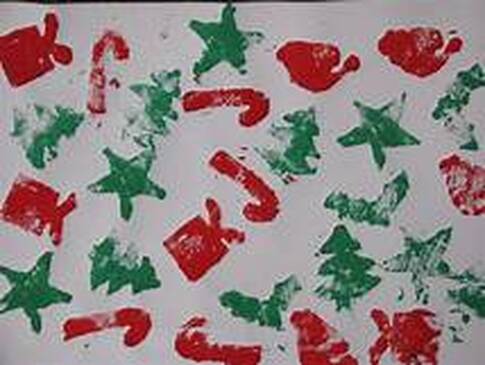
Super Stampers
Here's another simple option, but you'll need to do some pre-planning.
What you will need:
What to do:
To make your stamps:
Here's another simple option, but you'll need to do some pre-planning.
What you will need:
- Some white butchers paper or packing paper or brown paper
- Homemade stamps (see instructions)
- Some non-toxic poster paint... red, green, blue, gold... whatever takes your fancy
What to do:
To make your stamps:
- You can make stamps with lots of different things. Felt, cut to shape and glued to a cardboard backing with a handle makes a great stamp, but if you don't want to buy felt try the old potato version.
- Cut a potato in half and then cut the shape you want to print into the centre of the cut side. Think of simple shapes like a Christmas tree, a bell, a bauble or a star.
- Cut away the potato surrounding the shape to a depth of about 1 centimetre (1/2 ") so that you are left with the raised shape.
- You can also do this with store-bought pastry. Just cut a block of pastry and then cut the shape into one side and trim the surrounding pastry away as you would with a potato. Pastry has the added bonus of being able to be remoulded if your initial shape is a bit wonky.
- Pour some poster paint into a saucer, one saucer for each colour you want to use
- Press the stamp (felt, potato or pastry) into the paint and then press it onto your choice of paper.
- Mix and match colours and shapes to make the wrapping paper pattern of your choice.
- Scatter a dusting of glitter over the wet paint if you'd like some additional bling.
- Spread the pieces of paper out to dry
|
|
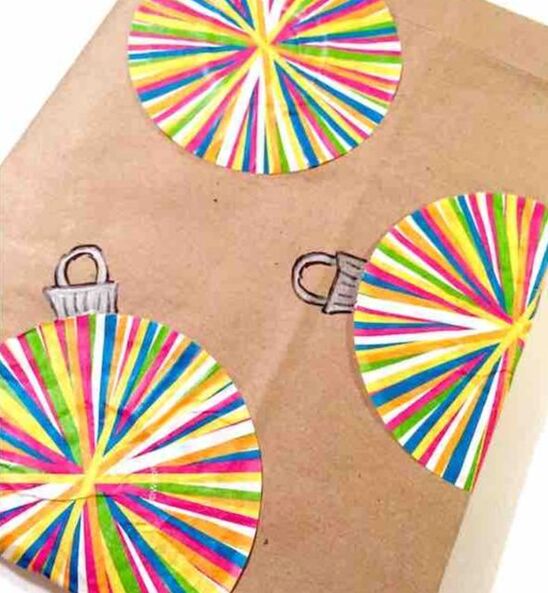
Cupcake Baubles
Here's a wonderful way to add a third dimension to your wrapping paper. Cupcake liners come in many different styles. You'll need the ones that are made from a circle of paper and then fluted to create the cupcake shape. There are lots of versions with Christmas designs on them or you can choose more generic patterns or solid colours. The choice is yours.
What you will need:
- Some white butchers paper or packing paper or brown paper
- A packet or two of cupcake liners
- Some craft glue
- A silver or gold metallic pen plus a black felt-tipped pen
What to do:- Flatten out a selection of cupcake liners
- Spread your chosen paper out and arrange your liners on the paper so they create a nice pattern
- Brush or squeeze a ring of glue onto the paper just inside the edge of the liner, plus a dot in the centre.
- Press your liner onto the glue and wipe any excess away with a tissue or cloth.
- Draw a square or rectangle at one edge, and then a half circle, to look like the hanging mounts on a Christmas bauble.
- Edge these shapes in black
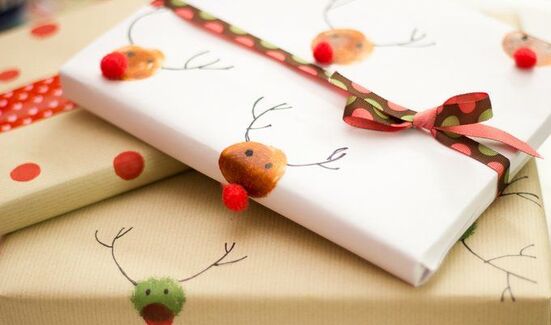
Reindeer rapping.
So easy and so cute. The grandkids will love this one.What you will need:
So easy and so cute. The grandkids will love this one.What you will need:
- What you will need:
- Some white butchers paper or packing paper or brown paper
- A sponge brush (You can make your own with a piece of rounded sponge held in a pair of tongs) If not using the pompoms (see below) you'll need two sizes, one for the head and one for the nose.
- Some non-toxic poster paint... reindeer brown or whatever takes your fancy
- A black felt-tipped pen
- Tiny red pompoms from a discount shop (Optional)
- Some craft glue
- Put the paint out in small bowels or saucers, one for each colour you are using
- Lay out a piece of white or brown paper (either works really well)
- Stamp head shapes randomly over the paper leaving enough space to add antlers
- If you are using paint for the noses, stamp this on in a contrasting colour. You might to make Rudolphs (reindeer brown with a red nose) or coloured reindeers with different coloured noses
- When the paint is dry glue on a red pompom (if you're making Rudolphs) or a contrasting coloured pompom for a nose.
- Draw in the antlers and two dots for the eyes
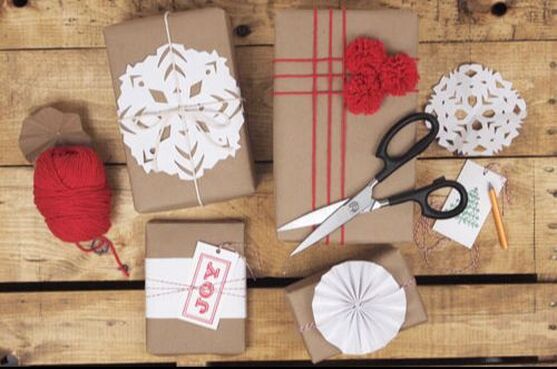
Snowflake Shapes
Whether you live in the northern or southern hemispheres we can almost guarantee that you learned to cut out snow flakes from piece of white paper. White paper on brown is a stylish look so you can use this combination in may different ways.
What you will need:
What to do:
Whether you live in the northern or southern hemispheres we can almost guarantee that you learned to cut out snow flakes from piece of white paper. White paper on brown is a stylish look so you can use this combination in may different ways.
What you will need:
- Some brown paper
- Some A4 copy paper
- A pair of scissors
What to do:
- Take a piece of copy paper
- Fold it over several times so that you have several layers that can still be cut through
- Cut out the corners, then unfold a layer and cut the corners again in a different shape
- Unfold again and cut some designs into the centre of each side
- Continue until you have unfolded all the layers. You should now have a symmetrical snowflake shape.
- Wrap your gifts in brown paper and then glue on a snowflake or, alternatively, glue snowflakes to the paper and cut to size for your gifts.
- Trim with whatever ribbon you have on hand.
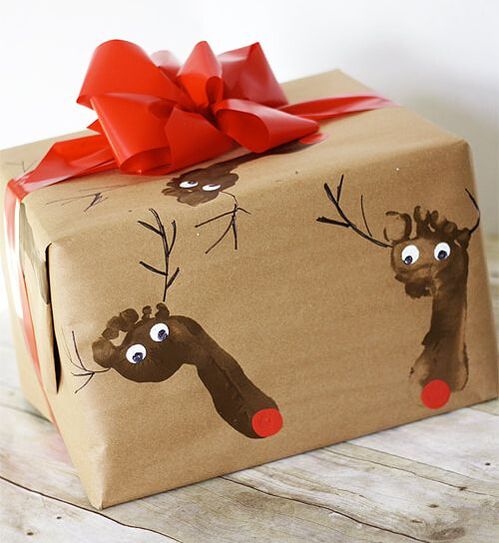
Footprint Reindeer
This one might be a little bit messy but the results are so cute.
What you will need:
What to do:
This one might be a little bit messy but the results are so cute.
What you will need:
- Some brown paper
- Some non-toxic poster paint... reindeer brown and red
- A black felt-tipped pen
- A large artists brush
- Some googley eyes from the discount shop or some small white adhesive dots
- A baking tray big enough to fit your grandchildren's foot into (or your own for that matter)
What to do:
- Put the paint out in small bowels or saucers
- Lay a piece of white or brown paper (brown gives a woodland sort of background)
- Get your grandkid/s to place one foot in the tray of paint, then lift it up and wait till the excess paint drips off.
- Now get them to place the foot onto the sheet of paper to leave an imprint
- Do this at random places ob the paper to create a pattern
- Now add the eyes near the toes, either with googley eyes or white dots, draw in the antlers and pupils if you're using dots and you're done
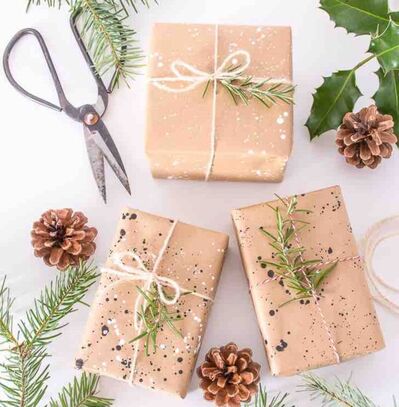
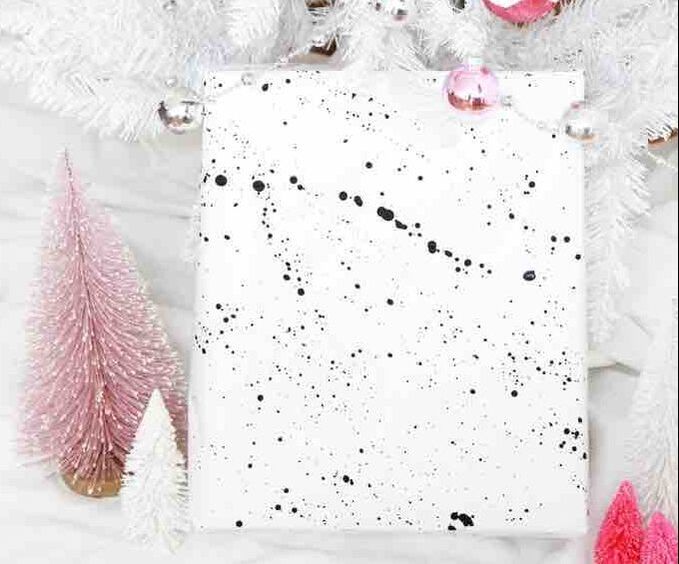
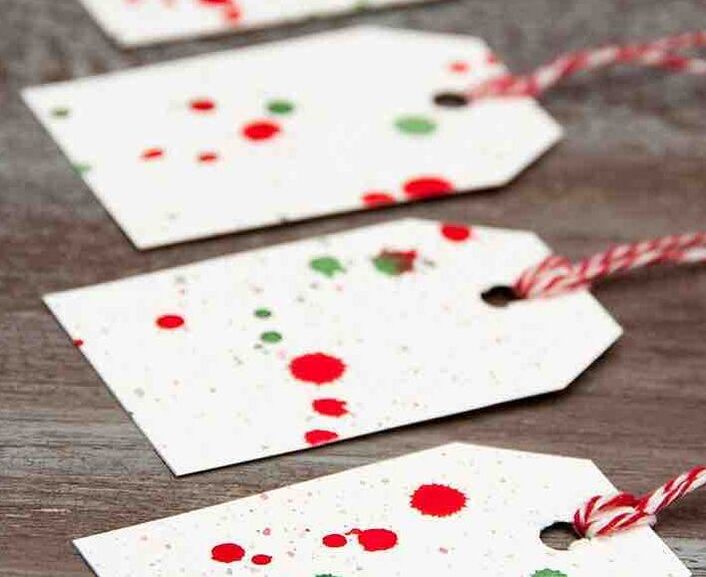
Splatter Scatter
Possibly the easiest of them all but you may need to do this outdoors. What you will need:
What to do:
|
|

Gold Star
You'll need to shop for this one but the effect can be stunning.
What you will need:
What to do:
You'll need to shop for this one but the effect can be stunning.
What you will need:
- Some brown paper
- A star shaped stamp (or any other Christmas shape you might like)
- Gold or silver metallic ink-pad
What to do:
- Lay out your sheet of brown paper (brown seems to work so nicely especially with gold but you could use white paper with silver ink)
- Cover the sheet with random stampings, making sure they are fully pressed so you get a complete shape with nice sharp edges
- If you have more than one stamp you can do different patterns either keeping them to a single shape or mixing them if the shapes are compatible
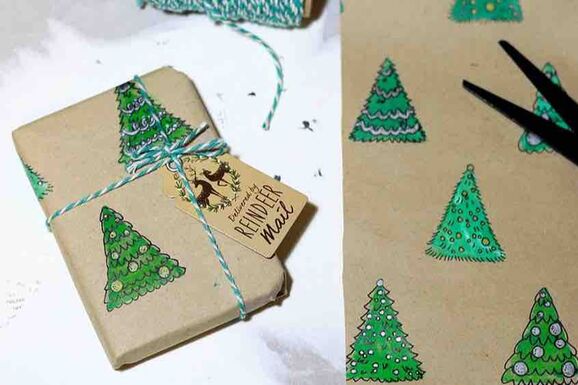
Christmas Forest
You'll probably need to shop for this one too but the options are almost limitless. Work out your design and what colours you want to use before you buy the pens that way you won't be tempted to spend too much on different colours. We've done it trees as they are so easy to draw, but you could do this with just about any Christmas motif.
What you will need:
What to do:
You'll probably need to shop for this one too but the options are almost limitless. Work out your design and what colours you want to use before you buy the pens that way you won't be tempted to spend too much on different colours. We've done it trees as they are so easy to draw, but you could do this with just about any Christmas motif.
What you will need:
- Some white butchers paper, packing paper or brown paper
- A selection of metallic coloured pens plus a black felt-tipped pen
What to do:
- Start by drawing your pattern on the paper lightly in pencil. Just a rough shape will do.
- This idea works best when the pattern is regular, so work out what size your tree or motif will be and then put a dot on the paper to mark where the centre of the image will be and then draw around it. Don'y be too worried about your drawing skills. The individuality of each drawing contributes to the artisan look.
- Colour in the tree shape leaving spaces for silver and gold baubles
- Edge the tree and its decorations in black
- This idea goes really well with rustic style ribbons and ties so think coloured string or raffia or even hessian